 The invoice can only be posted onto the account if sufficient goods receipt details remain against the order. The invoice can only be posted onto the account if sufficient goods receipt details remain against the order.
 VAT Only invoices need to be processed by Juliet Smith (Tax A/c Finance), who can be contacted on ext.36031.
|
If
|
Go To
|
|
You want to enter an invoice
|
|
|
You want to enter a credit Memo and you have the invoice on your desk
|
|
|
You want to enter a credit memo and the invoice it relates to has been sent to AP
|
|
|
You want to enter planned delivery costs
|
|
|
You want to enter unplanned delivery costs
|
|
|
You want to enter an early payment discount
|
|
|
You want to record construction industry tax
|
|
|
Troubleshooting when Debits are greater than Credits
|
|
|
Troubleshooting when Credits are greater than Debits
|
|
|
MM Numbering Structure
|
|
|
SAP Document Numbering Structure
|
|
|
Multiple Account Assignment
|
|
|
Multiple Purchase Order Numbers on Invoice or Credit Memo
|
|
|
You want to Change / Delete a Held or Parked document
|
|
|
You want to display an existing Invoice document
|
|
|
You want to Reverse an existing Invoice Document
|
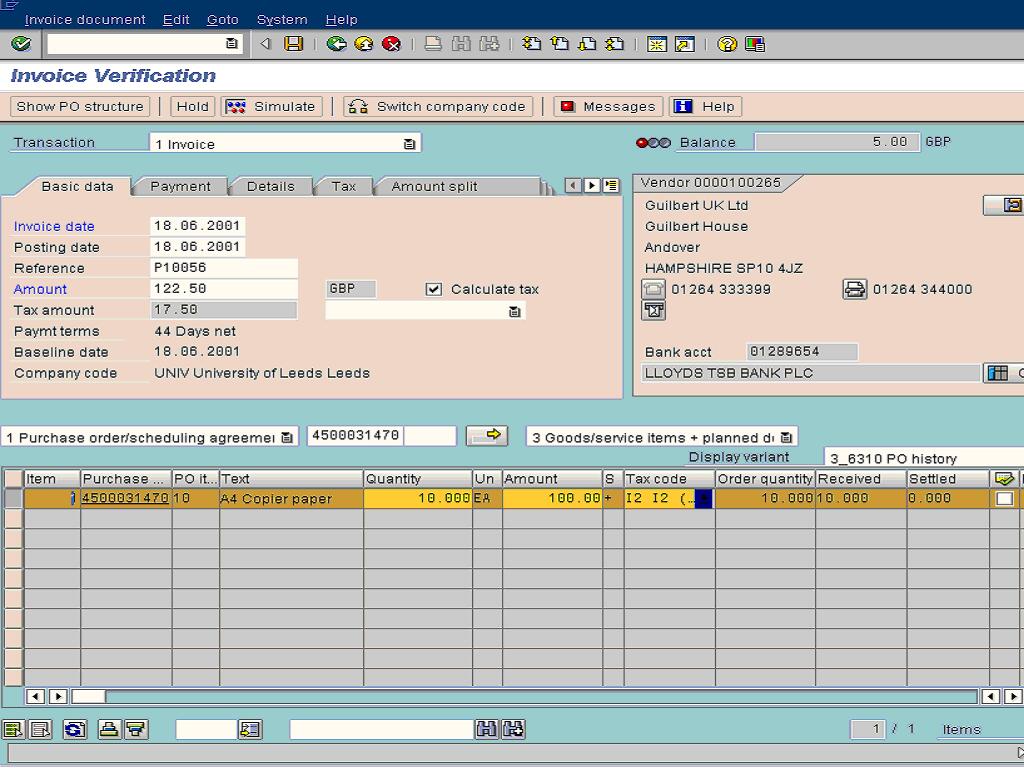
 . After selecting the Purchase order number and clicking on , SAP retrieves the purchase order and displays Header / Vendor information and Line item information.
 header tab.
 for a full list.
 header tab.
 header tab.
 header tab.
 header tab.
 This tab is only used when the vendor comes under the Inland Revenue Construction Industry tax scheme. For further details on the use of this tab refer to step 66 .
 header tab. Click on
  to move past the
  message. Displays contact details for individuals responsible for the various transactions.
 header tab. Enter any relevant text here. Text entered here will appear on the vendor line entry. NB: If the remittance is to be sent via an internal department you must enter the relevant department in this field and prefix with a *. The first 7 digits will be printed on the remittance to ensure that Accounts Payable can recognize and forward it to the correct department. It is possible to load a local file into the Note section. Text / Files from word can be imported into SAP using the
  icon. Details from the Vendor Master record are shown in the Vendor Header section of the screen.
 It is possible to view the Vendor master record directly from this screen by selecting the detail icon
  . For more detailed information on Vendor Master Record Display please see training documentation for Transaction XK03. It is also possible to view the Display Vendor Line Items: Transaction FBL1N by selecting the list icon
  . For more detailed information on Display Vendor Line items please see training documentation for Transaction FBL1N. This screen shows the line items on the purchase order number entered. The table shows particular details relevant to each individual item. The line items highlighted in yellow are those items which are eligible for invoices to post against them. If a line item is highlighted in yellow and does not appear on the invoice deselect it using the indent button on the left. Use the drop down menu to select various display variants. Each will show relevant information regarding each individual line item. There are numerous fields displayed on the ALL information variant and many are not relevant to UoL. Below are descriptions of the additional fields that may be of use.
 :
: . This means the Debits = Credits, the document balances and can now be posted. Note the purchase order actually contains 2 line items but only one has any quantity goods receipted against therefore the invoice only relates to line item 1.
 .
. ". The SAP Logistics Invoice Verification (61 series) document number must be entered on the top right hand corner of the invoice in GREEN ink. . Note the above balance is incorrect by �6.00. .
 shows that a tax code must be entered against the freight line item before continuing. . Then check the balance before trying to post the invoice.
 if all the information is correct therefore debits = credits and the invoice can now be posted. . . .
 |
If no freight charges were planned on the purchase order then no extra line items are entered onto the invoice. Tab on the Header section and enter the NET delivery costs charged, in the Unpl. Del. Csts field. .
 if all the information is correct therefore debits = credits and the invoice can now be posted. to post the invoice. VAT rules state that Value Added Tax (VAT) should be calculated on the NET value of the invoice AFTER early payment discount has been deducted, even if this discount is not claimed. This means that the discount element of the invoice is zero rated for VAT purposes.
|
Net Value
|
VAT rate
|
VAT Charged
|
|
�95.00 @
|
17.5% =
|
�16.63
|
|
�5.00 @
|
0.00% =
|
� 0.00
|
When entering the invoice in SAP the discount amount or percentage offered is entered in the Header details section under the Payment Tab. Note that the discount entered here will be deducted from the final payment to the supplier even if the terms of the discount are not met unless you follow the instructions detailed below. Early Payment discount when discount terms can't be met. If early payment discount should not be claimed the document should be entered as though the discount will be taken. When the invoice is forwarded to Accounts Payable send a memo to Accounts Payable giving details of the invoice including the SAP 61 document number and details of the Cost Object(s) to be charged with the lost discount. The Accounts Payable manager will then edit the relevant payment proposal to ensure that the discount is not taken. When receiving a discount ensure that the calculate Tax check box  is not selected on the Tax Tab - in order for manual entry of the Tax amount.
 this displays a multiple entry box The multiple purchase order line items will now be displayed in the item overview table.
 This shows the account information for the individual item. Ensure Credit Memo is selected in the Transaction box. . After selecting the purchase order number and clicking SAP retrieves the purchase order and displays Header, Vendor and line item information.
 tab. a warning message at the bottom of the screen is displayed "
 ".
". . The credit note can now be posted by clicking on .
 . Write the 61 document number in green ink on the top right hand side of the hardcopy credit note. Ensure that the "Credit Memo" or "subsequent credit" transaction is selected in the Transaction box. . After selecting the purchase order number and clicking SAP retrieves the purchase order and displays Header, Vendor and line item information.
 tab.
tab. button to access the dropdown list and select "Invoice Verification".
 . to post the credit note.
 . Write the 61 document number in GREEN ink on the top right hand side of the hardcopy credit note. Subsequent Debit - Use this transaction when an invoice is received after an invoice and credit have already been posted against the line items on the Purchase Order Subsequent Credit - when a partial credit has been received and not a full credit memo. Check Balance result shows debits are greater than credits.
|
If
|
Then
|
|
Net (ex vat) value of the invoice has been input rather than the gross (inc vat).
|
Amend the amount entered against line item 1.
|
|
Transposition of figures when inputting
|
Check input and amend where necessary.
|
|
Unit cost charged on invoice is less than unit cost on purchase order
|
Forward query sheet to purchase order point for investigation.
|
|
Wrong goods receipt detail selected for matching against the invoice
|
Cancel input and try again.
|
|
Quantity invoiced less than quantity entered on goods receipt
|
* Check that the correct goods receipt line item(s) have been selected for matching.
* Check that the unit of supply on the goods receipt and invoice correspond.
* If the above checks prove correct send query form to purchase order point.
|
|
Delivery costs included on invoice not entered in SAP
|
Enter Unplanned delivery costs.
|
|
Early payment discount is shown on invoice but not included when input into SAP
|
If the early payment is to be claimed enter the detail on the "Payment" tab.
|
|
VAT calculated by SAP Different to VAT on suppliers Invoice
|
Deselect the Calculate Tax
option and manually enter the VAT charged by the supplier in the Tax amount field |
Check balance result shows credit greater than debits.|
If
|
Then
|
|
Incorrect VAT code used when raising the purchase order e.g. I0 (vat not charged) used instead of I2 (vat charged not reclaimable etc).
|
Compare the VAT code against the line item with the VAT code on the invoice. If the line item shows that the VAT is not charged then change the VAT code in the dropdown.
|
|
Transposition of figures when inputting
|
Check input and amend where necessary.
|
|
Unit cost charged on invoice is greater than unit cost on purchase order.
|
Forward the query sheet to the purchase order point for investigation.
|
|
Wrong goods receipt detail selected for matching against the invoice.
|
Cancel input and try again.
|
|
Quantity invoiced more than quantity entered on goods receipt.
|
* Check the correct goods receipt line item(s) have been selected for matching.
* Check the unit of supply on the goods receipt and invoice correspond.
* If the above checks prove correct send query to the purchase order point.
|
|
Check if Invoice is already entered under accounting document 51xxxxxxxxx
|
*Check that the invoice being entered is not a duplicate invoice by looking at the Purchase Order history for the Purchase Order or look at Vendor line items and search for the invoice reference.
|
|
VAT calculated by SAP Different to VAT on suppliers Invoice
|
Deselect the Calculate Tax
option and manually enter the VAT charged by the supplier in the Tax amount field |
In some instances you may require the services of one of these vendors where the work is not subject to construction industry tax, in these cases follow steps 65 to 69 tab in the header details section of the MIRO screen. You will see the following screen: Warning: If the W.tax b/at and W/tax exempt fields are left blank SAP assumes the whole invoice is subject to tax. If the whole invoice is exempt from VAT, enter the gross amount in the W/tax exempt field. If part of the invoice is subject to withholding tax, enter the NET amount of the labour element in the W.tax b/at field. Doing nothing will result in SAP deducting income tax from the whole invoice. to save the invoice once you are happy that all information is correct. You will see the following message:
 to move past this message. The system will display the invoice document number at the bottom of the screen. You have now saved the invoice.
 tab in the header details section. W/tax b/at and W/tax exempt fields. If both of these fields are left blank for CIS5 and CIS6 vendors the system will report on the whole value of the invoice, or in the case of CIS4 it will deduct tax from the whole value of the invoice resulting in reduced payment to the supplier. to save the invoice once you are happy that all information is correct. The following message appears.
 to move past this message. The system will display the invoice document number at the bottom of the screen. You have now saved the invoice.
|
Numbering Range
|
Description
|
|
100000 - 199999
|
External Traders
|
|
300000 - 399999
|
Factoring Companies
|
|
400000 - 499999
|
External Expenses
|
|
500000 - 599999
|
Staff & Student Payments
|
|
899990 - 899999
|
One time vendors - Student refunds
|
|
900000 - 909999
|
External Vendor Ordering Address
|
|
999999
|
Internal Market vendor
|
|
2 Digit alpha codes
|
Internal Ordering Address
|
|
Activity
|
Notes
|
|
1000000 - 1999999
|
Purchase Requisition document
|
|
4500000000 - 4599999999
|
Purchase order document
|
|
5000000 - 5999999
|
Goods Receipt document
|
|
61000000 - 61999999
|
Logistics Invoice Verification document
|
|
1900000000 - 199999999
|
Invoice document (Accounts Payable)
|
|
1700000000 - 179999999
|
Accounts Payable Credit / Reversal
|
|
2000000000 - 299999999
|
Payment / clearing document
|
 to list the documents that can be changed or deleted. The documents are listed into three categories - Held Documents, Parked Documents and Docs complete for posting, as shown by the screen below. Alternatively, use the button
  and enter the document number and the year. Only Parked or Held documents can be Changed or Deleted.
 .
. and enter the Invoice Doc. Number and the fiscal year. Follow the menu path Transaction MR8M can also be used to Cancel or Reverse an existing invoice document. In SAP R/4 Enterprise 4.7, the MIRO functionality has been considerably enhanced. SAP R/3 4.6B transactions such as MR2M, MR3M and MR5M no longer exist and have been incorporated within MIRO.
 and then
 then
then 